Claims Based Authentication for SharePoint 2010–Part I
To allow users to access SharePoint, the platform, provides two authentication mechanisms & whenever, you create a new Web Application, you get these two authentication mechanisms as an option:
Classic Mode Authentication is a passé and use traditional approach to authenticate users with Active Directory. If you’re still using this mode of authentication – get a life.
Claims Based Authentication is the mantra of new generation SharePoint applications. It is like, whilst authentication, user says: My name is Anand Deshpande and here is my (identity claim) driving license issued by state government (or token from Facebook, Twitter, LinkedIn or from your other site). Here user claims to be
Anand Deshpande by providing some tokens. This can help in building internet facing web apps, where tons of users can’t be created in AD and using their existing credentials/claims (like again from Twitter, FB, LinkedIn) can be very helpful.
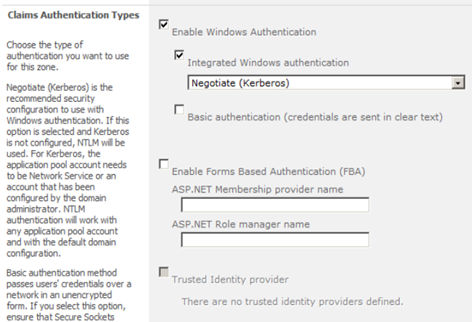
Once you select Claims Based Authentication, you get few options as mentioned:
By default, Windows Authentication is enabled so that you can crawl through the application even if you don’t have other type of account. If this is disabled, you won’t be able to access application, until and unless you’ve the account for claims mode.
Forms Based Authentication (which I’ll explain more in next blog post), is the most helpful authentication scheme provided by Claims Based Authentication. When you’re using Forms Based Authentication, user credentials/data will be stored in SQL Database (or LDAP, or other stores) and can be authenticated against. Not just AD.
If you want users to claim their identity through other accounts like Facebook, LinkedIn, Twitter, you need to allow them to do so. For that matter, you need to first trust these third-parties and mention them as Trusted Identity Provider. It is just like SharePoint saying, ‘I trust government issued driving licenses, do you have one?’
This can be done by creating a Secure Token Service and defining Trusted Identity Provider.
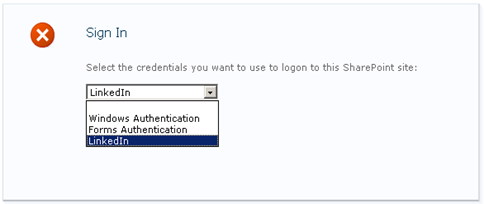
Once you provide these details, while browsing the sites, your users will have different options:
In next blog post, I’ll talk about using SQL Server and Forms Based Authentication with SharePoint 2010. Till then,


Comments
Post a Comment